Google
 

2008 Lexus IS F


Short Take Road Tests

Why the letter “F” in the new V-8–powered, 416-horsepower Lexus IS F? Simple: Toyota’s luxury brand and the letter F have a long history. In the mid-1980s, the Lexus luxury division was then just a classified notepad document codenamed “Circle F.” The first Lexus LS400 of 1989 was known internally as the “F1” or “Flagship.” And the stylized Fs on the 2008 IS F are drawn, it’s said, to mimic a few hairpin turns of Toyota’s Higashi-Fuji test track.

This first F (there’ll be more Lexus models with the F treatment soon, most likely) is a V-8–powered sledgehammer that rockets to 60 mph in 4.2 seconds—fleeter by 0.1 second than the new M3—has a 172-mph speed governor, and generates 0.92 g on the skidpad. It also keeps us grinning through hard track laps, even though the frequent fill-ups of premium were inhaled by street driving at the rate of 16 mpg. We’ll have to wait until March, 2008, when the IS F goes on sale at an expected price around $59,000 to see how many buyers are interested in a wicked-performing Lexus.

Developed in cooperation with Yamaha, the IS F’s engine, or the 2UR-GSE as Toyota calls the 416-hp variant of the 389-hp 5.0-liter V-8 found in the LS600h hybrid, sans hybrid gear, is peakier, actually losing 17 pound-feet of torque on the operating table as the changes pushed the horsepower and torque peak higher up the revs. Solid lifters and titanium intake valves with 10 percent more lift reside in new higher-flow cylinder heads. At full throttle above 3400 rpm, a barn door in the box snaps open with vacuum released from a small reservoir, and the unleashed induction noise is raw and thrilling.


Interior Comfort

Polished paddles put your fingers in charge when you wish it. And they’ll be busy, the swift-revving engine and ratio-stuffed, eight-speed automatic gearbox bringing forth the redline cutoff with annoying frequency. With all that engine fettling, the warning beep reminding you to upshift at 6400 rpm and the cut-out at 6800 rpm feel a bit low. The new 414-hp BMW M3’s engine screams all the way to 8400 rpm.

Despite the bling of braided-aluminum trim on the doors and shifter console, temperance rules indoors. Blue-lit gauges and blue seat stitching, alloy pedals, a digital gear-position display, and the subtle F logo on the wheel are the differentiators that drivers see. The base car’s rear bench is divided in the IS F into two non-folding buckets with a ski pass-through.


At leisure speeds, the air is hushed, Lexus-like, with just a distant snort from the engine and the extra thrum of the fat summer Michelins disturbing the peace. Given the low profile of the rubber mounted to the 19-inch forged aluminum rims, the ride is tightly controlled but commendably mellow. The ride-and-handling balance is perhaps the IS F’s biggest achievement. It makes allowances for road fissures and drops the body into holes with cushioned lurches.


Driving Dynamics

It also permits the 3800-pound car some restrained roll through the esses but not enough to wither confidence. The IS F’s steering rack accurately puts tires where they’re needed and provides talk-back, albeit faint, on how things are holding. And hold they do, with excellent grip.

The all-important sport button also perks up throttle response and relaxes the stability-control system to allow some controlled tail-out action. Lexus also allows you to shut the system completely off, but the shutdown can only be called for while at full stop. Brembo-sourced front calipers on broad cross-drilled rotors deliver solid braking but with a soft pedal.

The muted interior, the slightly watery controls, the heavy price tag; the IS F is at core a Lexus with extra muscle, not as raw as the BMW M3 or Mercedes C63 AMG. The next steps for F may decide if the performance sub-brand thrives or is only a brief experiment.


Specs

VEHICLE TYPE: front-engine, rear-wheel-drive, 4-passenger, 4-door sedan

ESTIMATED PRICE AS TESTED: $60,000 (estimated base price: $59,000)

ENGINE TYPE: DOHC 32-valve V-8, aluminum block and heads, direct fuel injection

Displacement: 303 cu in, 4969cc
Power (SAE net): 416 bhp @ 6600 rpm
Torque (SAE net): 371 lb-ft @ 5200 rpm

TRANSMISSION: 8-speed automatic with manumatic shifting

DIMENSIONS:
Wheelbase: 107.5 in
Length: 183.5 in
Width: 71.5 in
Height: 55.7 in
Curb weight: 3800 lb

TEST RESULTS:
Zero to 60 mph: 4.2 sec
Zero to 100 mph: 9.8 sec
Zero to 150 mph: 24.7 sec
Street start, 5–60 mph: 4.6 sec
Standing ¼-mile: 12.7 sec @ 114 mph
Top speed (governor limited): 172 mph
Braking, 70–0 mph: 159 ft
Roadholding, 300-ft-dia skidpad: 0.92 g

Car Scratch Repair

Your vintage sports car deserves the best treatment, which is why you always park it in the farthest, emptiest reaches of the lot, as far as you can get from the possibility of a casual door ding perpetrated by a careless shopper. You even park it straddling two spaces, to protect its tender flanks.

To your horror, a quick trip into the department store, punctuated by two long hikes across an empty expanse of lot (one into the store and a second back to the car), ends in your worst nightmare. Your car has been keyed by some psychopath, who even had the temerity to write you a rude note about the inappropriateness of your parking habits.

Anatomy of Scratch
All scratches are not the same. Some “scratches” may not even be scratches at all. You find these when a painted car bumper or wooden post, or the rubber bumper on a shopping cart, rubs up against the body. The object doing the rubbing may be softer than the paint. Instead of scratching the car, it deposits material on the paint surface — a mark that is actually raised above the paint, not gouged into it.

If the object is harder than the paint, guess where the material gets transferred? From your car to the shopping cart, leaving paint missing. Some scratches can be rescued, while others can’t.

But many marks simply “scratch the surface,” as it were. The offending object gouges the clearcoat and even some of the base color, while leaving the primer and metal unscathed. When there’s still color at the bottom of the scratch it may be possible to remove it with some careful sanding, buffing and waxing.

Fixing Scratches
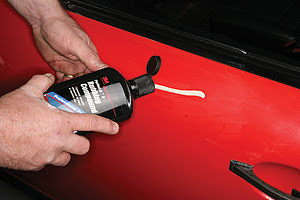
You don’t need fancy tools to distinguish a scratch from a mark. A fingernail drawn over the surface at 90 degrees to the defect will tell you if it’s gouged into the paint or sitting on top of it. If it’s a mark that appears to be from rubber, plastic or even other paint, it may come off easily with an aerosol tar or adhesive remover. Stubborn marks often can be removed with acetone or lacquer thinner on a soft rag. If the mark is still there after using one of these solvents, try hand rubbing or polishing compound. First, clean the area with soap and water, then spread rubbing compound on the mark and rub the area in a circular motion until the mark disappears. Once it’s gone, switch to a back-and-forth motion to remove circular buffing marks. Buff the area with a clean cloth to remove rubbing compound. Then, using a fresh pad, clean the area with polishing compound to remove the fine scratches left by the rubbing compound. Finish by sealing the surface with a good car wax.

If the defect is a scratch, determine if it extends below the surface of the paint and into the primer. Sometimes one end of the scratch looks fine but the other end gets deeper and deeper until it breaks through into the primer and the metal underneath. How much of that scratch is below the color? If it’s a small portion of the entire scratch, you may want to repair what you can, and just try to ignore the rest until you’re prepared to repaint the panel.

Modern cars are almost always clearcoated over the color layer of the paint. This is done to provide a shinier finish, as well as to prevent ultraviolet light from fading the pigment underneath it.

Scratches in clearcoat can similarly be sanded out. However, if you sand completely through the clear into the color underneath, you have to respray the clear on that panel. That’s still easier than trying to match the color of the original paint, spraying the panel and then clear­coating over it. If the scratch goes into the primer, you’ll be forced do exactly that.

Nitty-Gritty Time
To repair a scratch, start by washing the panel with soapy water and then drying it thoroughly. To fix the scratch you won’t really be removing it at all. Rather, you’ll be sanding down the paint surrounding the damaged area until they are both at the same level. As you might guess, the goal is to sand down to the level of the scratch without sanding through to the next layer.

To make sure you don’t go too far, rub a material into the scratch that contrasts with the paint color. If the car is a dark color, use white shoe polish, and the other way around. Wite-Out or another light-colored material will work. Once the contrasting color is in the scratch, sand remaining material from the paint surface.


Shoe polish can be used to visualize the scratches.

Wipe the shoe polish over the panel. This fills the scratches with polish.

Block sand the panel with 2000-grit wet/dry sandpaper and plenty of water. Sand until the shoe polish disappears.

Polish out the sanding scratches with rubbing compound.

A polishing wheel makes short work of bringing the shine back. An oscillating polisher is less aggressive than this rotary polisher. Don't buff through the paint into the next layer, especially on high-crown or sharp edges.

Finish with light hand buffing to remove the last of the compound. Follow with car wax.


The key to sanding safely is to use an ultrafine 2000- to 3000-grit wet/dry sandpaper, which is available at auto parts stores where body shop supplies are sold. Place the paper on a rubber sanding block or a wood block, then dip it in a bowl of cold water. Add two or three drops of liquid dish detergent to make the water more slippery and to improve cutting action. Sand the scratch area using light, short strokes at alternating 60-degree angles to the scratch. Move up and down the length of the scratch, stopping frequently to rinse the paper in the water. The goal is to work slowly and lightly until you see the contrasting mark disappear.

Once it is gone, dry the sanded area thoroughly and inspect it for any signs of the scratch. If you have clearcoat paint and the sanding water shows any sign of color, you’ll have to respray the clear. If you have conventional (nonclearcoat) enamel or lacquer, the water will show plenty of color. Once the scratch is gone — and you haven’t sanded down to the next layer — buff the area with rubbing compound. A power buffer works fast, but you can do a fine job on smaller areas with no more than a terry cloth washcloth and a bottle of compound. Buff in a circular motion, and lift up the haze with a terry cloth towel.

When the sandpaper scratches are gone, use a soft cloth to remove any of the relatively coarse compound. You may need to wash the area with water. Replace the rubbing-compound pad on the machine with a foam polishing-compound pad, and buff the entire area with very fine compound or swirl mark eliminator. Once the polishing is done, inspect the area, then seal the paint with car wax.

Bleeding Your Brakes

Air in the brake system can make your brake pedal feel spongy and vague. It takes only an hour or two to bleed the system. The fluid should be flushed every two to three years.


Your elderly car has required little in the way of episodic repair, for which you're glad. But at your last scheduled maintenance, the service manager advised you that you would need to replace the brake pads, front and rear, before too long. But deferring that expense for a while wouldn't be a problem, he said.

And all was fine for a couple of months, until you noticed the brake pedal dipping a little too close to the carpet while sitting at traffic lights. Not a big problem. Replacing the pads yourself on a Saturday morning should do the trick.

Except that now, despite the new pads all around, the brake pedal still feels spongy and low. You need to bleed your brakes.


Air-Cooled

Here's what happened. The pads wore so thin that the brake fluid level dropped too low in the master cylinder reservoir. An air bubble or three got pumped into the lines. And because air is compressible, you now have the equivalent of a very soft spring in the solid column of brake fluid between your foot and the wheels. Bleeding the brakes will flush that air out.

The job also involves replacing the old fluid with fresh, which is a good thing. Why would the fluid need to be replaced? It becomes contaminated with atmospheric dirt and abrasive metal wear particles from moving parts in the master cylinder and calipers. It absorbs moisture from the air, which can lower the boiling point of the fluid enough to make it boil at the end of a long downhill grade. (And steam, like air, is compressible.) High temperatures from those high-energy-dissipation stops can degrade the alcohol-based fluid itself. Eventually, your water-clear brake fluid starts to look more like squid ink.

Antilock braking systems are even less tolerant of contaminated fluid and air than non-ABS. The ABS hydraulic pump operates at several thousand psi, forcing brake fluid through very small valves. This can whip air and brake fluid into something like the foam on a latte, which makes bleeding difficult. Those same valves and pump can easily be damaged by tiny abrasive particles.

The good news: Air that has entered the ABS controller can be bled out. Bad news: Some vehicles require the use of a hideously expensive proprietary ABS scan tool to cycle the pump and valves to purge the last of the air. But there's a simple solution to that: Never let any air enter the system. You can flush a system with fresh fluid by using nothing more than a wrench that fits the bleeder bolts — and a helper with a normal attention span.


Let It Bleed

To properly bleed the brakes, start with a couple of 8-ounce cans of fresh brake fluid. An unopened can has a long shelf life. An opened can should be discarded within a few weeks. Get the vehicle up in the air and remove all four wheels. Well, okay, you might be able to do this with the wheels on if you can swing a wrench on the bleeder valves.


Suck the old fluid and sediment out of the master cylinder reservoir with a turkey baster or syringe.

Top off the reservoir with fresh fluid regularly as you bleed the system. Don’t let it get more than half empty.


So, your next task is to make sure the bleeder valves can be loosened. You'll need a box wrench that fits the bleeder bolt. A crescent wrench or Vise-Grip probably will just round off the bolt's flats. A little penetrating oil drizzled on the bolts the day before will help. So will some judicious tapping with a hammer to break up any corrosion. Loosen the bolts, but leave them closed.

If you can't turn the bleeders without breaking them off, you'll need to replace the brake calipers or wheel cylinders. See the above notation about penetrating oil and light hammer taps before applying enough torque to break these minuscule, hollow bolts.

Sneak into the kitchen and appropriate the small turkey baster. Remove the top to the master cylinder reservoir and suck out as much of the old squid ink as you can. Clean any sediment out of the reservoir with a clean, lint-free rag. Do not spill any brake fluid on any painted surfaces — it will remove the paint pretty much immediately.

Get a piece of clear plastic tubing (aquarium tubing is fine, and it's cheap). Push one end of the tube over the brake bleeder bolt at the right rear of the car. Put the other end of the tube into a small, clear bottle with an inch or two of clean brake fluid in it. (This will keep air from being sucked back into the brake cylinder or caliper.) Put a piece of 1 x 4 lumber or some other spacer under the pedal to prevent the pedal from traveling too far when line pressure is released. Top off the master cylinder reservoir with fresh fluid and put the cover back on the reservoir. Fluid will squirt out of an open reservoir every time the pedal is released.


Cue the Helper

Your helper needs to be someone who can follow instructions exactly. He or she won't get dirty hands so you don't need to pull one of your pals away from the ballgame. A teenager in a white dress will do fine. Have your helper sit in the driver's seat and await your orders. Here's the drill: You say "down." He or she depresses the brake pedal with about the same amount of force needed to keep the car from rolling forward at a traffic light. Then your helper says "down" and keeps the pressure on. When you hear the call, warn your helper that the brake pedal is about to sink underfoot and to keep the pressure on constantly. Then crack the bleeder bolt a quarter-turn.


A bleeder bolt can become difficult to remove. Use a proper-fitting box wrench to keep from rounding it off.


Got ABS? You may need to use a scan tool during the bleeding process to cycle the pump and valves.


Some of the old, contaminated fluid will trickle down the tubing into your bottle. When the trickle stops, close the bleeder. Then you say "up." Your helper says "up," and removes his or her foot from the pedal.

Repeat this process until fresh, clear fluid comes from the bleeder. Any out-of-sequence moves can suck air into the caliper. Yes, the end of the tubing is submerged in fluid, but air can travel past the threads on the bleeder bolt into the caliper if there's ever any negative pressure in the system while the bleeder is cracked.

Every half-dozen or so iterations, top off the reservoir with fresh fluid. Do not allow the reservoir to get more than half empty — air can be sucked into the master cylinder unless the fluid level remains well above the bottom of the reservoir that feeds the cylinder.

Once clean fluid is coming out of the brake, snug the bleeder bolt and move your operation to the left rear wheel and start all over again. Next repeat the process with the right front and finally with the left front. Follow that with a few strokes of fresh fluid from all four, again. Don't forget to keep the reservoir topped off.


Air Breather

For an older vehicle without an antilock braking system, this process will do a great job even if you have air in the system, say, after replacing a caliper or master cylinder. For advice on bleeding ABS, you'll need to consult your service manual. There may be a bleeder bolt right on the ABS controller, or you may need to beg, borrow or steal an ABS-capable scan tool.